10.3.4. zabbix 分布式安装
- zabbix server的模式:
server:即zabbix服务器,如果是分布式部署的时候可以被叫做master
nodes:这种模式在zabbix2.x以及之前的版本有,在zaibbix3.X及以后版本都被proxy取代。没有nodes了。
proxy:及监控代理模式,可以有效减轻zabbix server的压力(主要是io压力)
- 参考:
proxy支持的各种功能:https://www.zabbix.com/documentation/3.4/zh/manual/distributed_monitoring/proxies nodes支持的各种功能:https://www.zabbix.com/documentation/2.0/manual/distributed_monitoring/nodes
10.3.4.1. 环境
- 服务器系统环境:
- 系统:
CentOS6.6 64位
- 内核:
2.6.32
- 主机名:
zzjlogin
 1[root@proxy ~]# hostname
 2proxy
 3[root@proxy ~]# uname -a
 4Linux proxy 2.6.32-504.el6.x86_64 #1 SMP Wed Oct 15 04:27:16 UTC 2014 x86_64 x86_64 x86_64 GNU/Linux
 5[root@proxy ~]# uname -r
 62.6.32-504.el6.x86_64
 7[root@proxy ~]# cat /etc/redhat-release
 8CentOS release 6.6 (Final)
 9
10[root@proxy ~]# cat /proc/version
11Linux version 2.6.32-504.el6.x86_64 (mockbuild@c6b9.bsys.dev.centos.org) (gcc version 4.4.7 20120313 (Red Hat 4.4.7-11) (GCC) ) #1 SMP Wed Oct 15 04:27:16 UTC 2014
- zabbix软件:
zabbix版本:3.4.14
1[root@proxy ~]# rpm -qa zabbix*
2zabbix-server-mysql-3.4.14-1.el6.x86_64
3zabbix-release-3.4-1.el6.noarch
4zabbix-web-3.4.14-1.el6.noarch
5zabbix-agent-3.4.14-1.el6.x86_64
6zabbix-web-mysql-3.4.14-1.el6.noarch
- 代理服务环境:
和服务器系统以及软件完全一致
- 软件环境是:
zabbix-proxy-mysql-3.4.14-1.el6.x86_64
zabbix-release-3.4-1.el6.noarch
zabbix-agent-3.4.14-1.el6.x86_64
proxy的MySQL也是用本地的yum安装的mysql-server
10.3.4.2. 主服务器安装(zabbix server/master)
10.3.4.3. 代理服务器安装(zabbix proxy)
监控代理的部署,一般是在一个服务区域子网可以配置一台监控代理服务器。
注意
触发器计算(Calculating triggers)不支持
处理事件(Processing events)不支持
发送报警(Sending alerts)不支持
远程命令(Remote commands)不支持
备注
zabbix proxy 数据库必须和 server 分开,否则数据会被破坏。
10.3.4.3.1. 代理服务安装配置
10.3.4.3.1.1. 网络时间同步
1[root@proxy ~]# date
2Thu Sep  6 21:07:25 CST 2018
3[root@proxy ~]# ntpdate pool.ntp.org
428 Sep 00:53:38 ntpdate[1577]: step time server 5.103.139.163 offset 1827966.915121 sec
10.3.4.3.1.2. 关闭selinux
注意
如果不关闭selinux也没有配置selinux。则安装以后zabbix会启动失败。会发现zabbix网页可以访问,但是提示zabbix服务没有启动。
- 永久关闭:
下面配置会让selinux的关闭重启系统后还是关闭状态。但是配置不会立即生效。
注意
通过 source /etc/selinux/config 也不能让修改的文件立即生效。所以需要下面的临时关闭的方式结合使用。
1[root@proxy ~]# sed -i 's/SELINUX=enforcing/SELINUX=disabled/' /etc/selinux/config
2[root@proxy ~]# grep SELINUX /etc/selinux/config
3# SELINUX= can take one of these three values:
4SELINUX=disabled
5# SELINUXTYPE= can take one of these two values:
6SELINUXTYPE=targeted
- 临时关闭:
下面配置是立即生效,但是系统重启后会失效。
1[root@proxy ~]# getenforce
2Enforcing
3[root@proxy ~]# setenforce 0
4[root@proxy ~]# getenforce
5Permissive
10.3.4.3.1.3. 关闭防火墙
注意
防火墙一般都是关闭。如果不不关闭,也可以通过配置规则允许所有使用的端口被访问。
1[root@proxy ~]# /etc/init.d/iptables stop
2iptables: Setting chains to policy ACCEPT: filter          [  OK  ]
3iptables: Flushing firewall rules:                         [  OK  ]
4iptables: Unloading modules:                               [  OK  ]
10.3.4.3.1.4. 安装zabbix官方源
1[root@proxy ~]# rpm -ivh http://repo.zabbix.com/zabbix/3.4/rhel/6/x86_64/zabbix-release-3.4-1.el6.noarch.rpm
2Retrieving http://repo.zabbix.com/zabbix/3.4/rhel/6/x86_64/zabbix-release-3.4-1.el6.noarch.rpm
3Preparing...                ########################################### [100%]
4    1:zabbix-release         ########################################### [100%]
10.3.4.3.1.5. 安装zabbix-proxy、zabbix-agent
1[root@proxy ~]# yum install zabbix-proxy-mysql
2[root@proxy ~]# yum install zabbix-agent
10.3.4.3.1.6. 配置zabbix-proxy的MySQL数据库初始化
1[root@proxy ~]# yum install mysql-server
2
3[root@proxy ~]# /etc/init.d/mysqld start
登陆数据库,清理空账号信息,创建zabbix数据库,并创建授权访问数据库的用户:
注意
如果把zabbix-server的数据库文件导入到proxy的数据库中,proxy会不能启动,日志会提示数据库不可以用zabbix server的数据库。
  1[root@proxy ~]# mysql -uroot -p
  2Enter password:
  3Welcome to the MySQL monitor.  Commands end with ; or \g.
  4Your MySQL connection id is 3
  5Server version: 5.1.73 Source distribution
  6
  7Copyright (c) 2000, 2013, Oracle and/or its affiliates. All rights reserved.
  8
  9Oracle is a registered trademark of Oracle Corporation and/or its
 10affiliates. Other names may be trademarks of their respective
 11owners.
 12
 13Type 'help;' or '\h' for help. Type '\c' to clear the current input statement.
 14
 15mysql> use mysql;
 16Reading table information for completion of table and column names
 17You can turn off this feature to get a quicker startup with -A
 18
 19Database changed
 20mysql> show databases;
 21+--------------------+
 22| Database           |
 23+--------------------+
 24| information_schema |
 25| mysql              |
 26| test               |
 27+--------------------+
 283 rows in set (0.00 sec)
 29
 30mysql> select user,host from user;
 31+------+-----------+
 32| user | host      |
 33+------+-----------+
 34| root | 127.0.0.1 |
 35|      | localhost |
 36| root | localhost |
 37|      | proxy     |
 38| root | proxy     |
 39+------+-----------+
 405 rows in set (0.00 sec)
 41
 42mysql> drop user ""@"localhost";
 43Query OK, 0 rows affected (0.00 sec)
 44
 45mysql> drop user ""@"proxy";
 46Query OK, 0 rows affected (0.00 sec)
 47
 48mysql> drop user "root"@"proxy";
 49Query OK, 0 rows affected (0.00 sec)
 50
 51mysql> select user,host from user;
 52+------+-----------+
 53| user | host      |
 54+------+-----------+
 55| root | 127.0.0.1 |
 56| root | localhost |
 57+------+-----------+
 582 rows in set (0.00 sec)
 59
 60mysql> select user,host,password from user;
 61+------+-----------+-------------------------------------------+
 62| user | host      | password                                  |
 63+------+-----------+-------------------------------------------+
 64| root | localhost | *23AE809DDACAF96AF0FD78ED04B6A265E05AA257 |
 65| root | 127.0.0.1 |                                           |
 66+------+-----------+-------------------------------------------+
 672 rows in set (0.00 sec)
 68
 69mysql> update user set password=password("123") where user="root" and host="127.0.0.1";
 70Query OK, 1 row affected (0.01 sec)
 71Rows matched: 1  Changed: 1  Warnings: 0
 72
 73mysql> select user,host,password from user;
 74+------+-----------+-------------------------------------------+
 75| user | host      | password                                  |
 76+------+-----------+-------------------------------------------+
 77| root | localhost | *23AE809DDACAF96AF0FD78ED04B6A265E05AA257 |
 78| root | 127.0.0.1 | *23AE809DDACAF96AF0FD78ED04B6A265E05AA257 |
 79+------+-----------+-------------------------------------------+
 802 rows in set (0.00 sec)
 81
 82mysql> create database zabbix;
 83Query OK, 1 row affected (0.00 sec)
 84
 85mysql> show databases;
 86+--------------------+
 87| Database           |
 88+--------------------+
 89| information_schema |
 90| mysql              |
 91| test               |
 92| zabbix             |
 93+--------------------+
 944 rows in set (0.00 sec)
 95
 96mysql> grant all privileges on zabbix.* to zabbix@localhost identified by 'password';
 97Query OK, 0 rows affected (0.00 sec)
 98
 99mysql> exit
100Bye
101
102
103[root@proxy ~]# cd /usr/share/doc/zabbix-proxy-mysql-3.4.14/
104[root@proxy zabbix-proxy-mysql-3.4.14]# ls
105AUTHORS  ChangeLog  COPYING  NEWS  README  schema.sql.gz
106[root@proxy zabbix-proxy-mysql-3.4.14]# zcat schema.sql.gz | mysql -uroot -p123 zabbix
10.3.4.3.1.7. 配置zabbix-proxy配置文件修改
备注
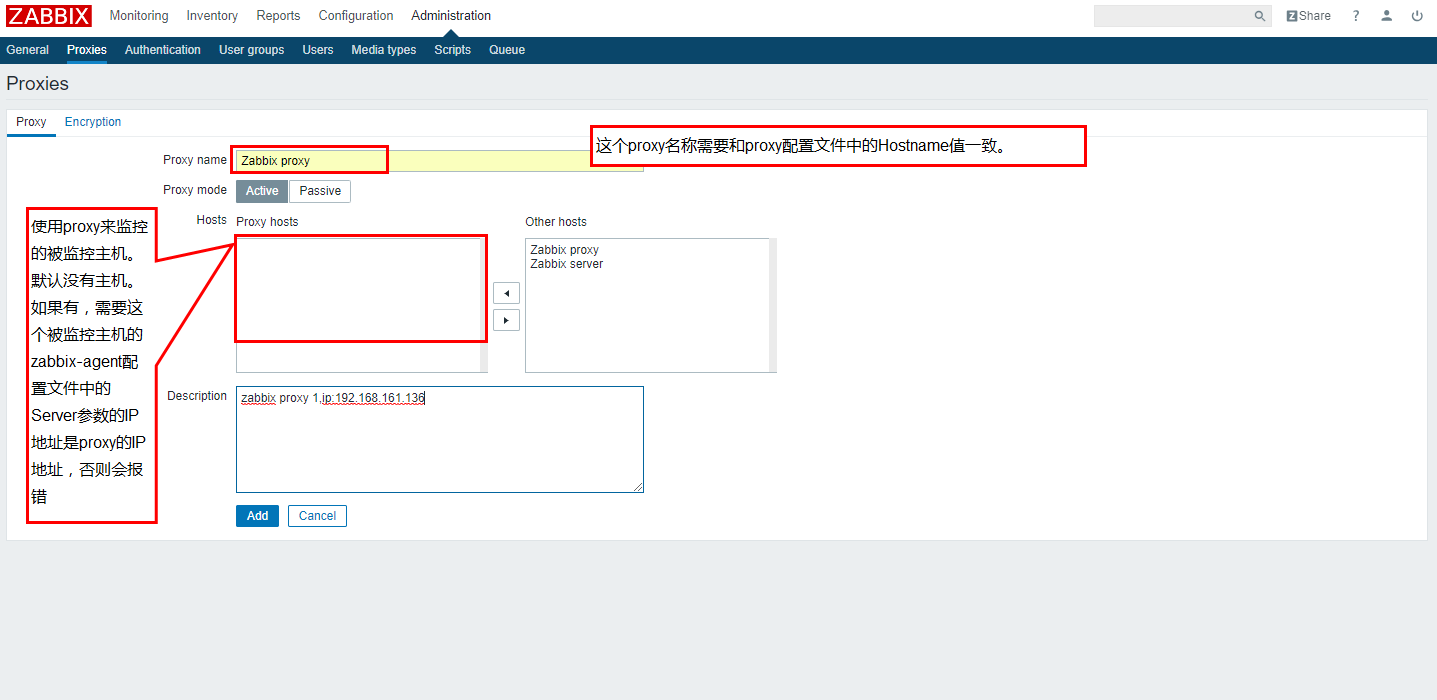
本例中没有修改proxy默认的名称,默认名称是:Zabbix proxy,如果有多个proxy,需要名称标准化。
这个配置参数在文件 /etc/zabbix/zabbix_proxy.conf 中的参数Hostname指定。配置这个参数的方法
和zabbix-agent的配置客户端主机名方法相同。
1[root@proxy ~]# sed -i 's#Server=127.0.0.1#Server=192.168.161.132#g' /etc/zabbix/zabbix_proxy.conf
2[root@proxy ~]# sed -i 's/DBName=zabbix_proxy/DBName=zabbix/g' /etc/zabbix/zabbix_proxy.conf
3[root@proxy ~]# sed -i 's/# DBPassword=/DBPassword=password/g' /etc/zabbix/zabbix_proxy.conf
4[root@proxy ~]# sed -i 's/# ConfigFrequency=3600/ConfigFrequency=10/g' /etc/zabbix/zabbix_proxy.conf
- 如果需要自定义proxy向server同步配置的时间间隔可以修改以下参数:
默认时1小时同步一次。即服务器配置后最长时间是1小时后proxy才可以同步到这个修改。
/etc/zabbix/zabbix_proxy.conf文件中的ConfigFrequency=3600修改为指定的多少秒即可。(本例中是10秒)
小技巧
默认proxy会自动把本地的数据打包发送给server,默认时1秒钟发送一次,可以修改配置文件/etc/zabbix/zabbix_proxy.conf
中的参数 DataSenderFrequency
10.3.4.3.1.8. zabbix_proxy配置命令集合
 1ntpdate pool.ntp.org
 2sed -i 's/SELINUX=enforcing/SELINUX=disabled/' /etc/selinux/config
 3setenforce 0
 4getenforce
 5/etc/init.d/iptables stop
 6yum install mysql-devel mysql-server -y
 7
 8rpm -ivh http://repo.zabbix.com/zabbix/3.4/rhel/6/x86_64/zabbix-release-3.4-1.el6.noarch.rpm
 9yum install zabbix-proxy-mysql zabbix-agent -y
10
11/etc/init.d/mysqld start
12/usr/bin/mysqladmin -u root password '123'
13mysql -uroot -p
14
15use mysql;
16drop user ""@"localhost";
17drop user ""@"proxy";
18drop user "root"@"proxy";
19update user set password=password("123") where user="root" and host="127.0.0.1";
20create database zabbix;
21grant all privileges on zabbix.* to zabbix@localhost identified by 'password';
22grant all privileges on zabbix.* to zabbix@192.168.161.136 identified by 'password';
23flush privileges;
24exit
25
26cd /usr/share/doc/zabbix-proxy-mysql-3.4.14/
27zcat schema.sql.gz | mysql -uroot -p123 zabbix
28
29
30sed -i 's#Server=127.0.0.1#Server=192.168.161.132#g' /etc/zabbix/zabbix_proxy.conf
31sed -i 's/DBName=zabbix_proxy/DBName=zabbix/g' /etc/zabbix/zabbix_proxy.conf
32sed -i 's/# DBPassword=/DBPassword=password/g' /etc/zabbix/zabbix_proxy.conf
33sed -i 's/# ConfigFrequency=3600/ConfigFrequency=10/g' /etc/zabbix/zabbix_proxy.conf
34
35/etc/init.d/zabbix_proxy start
36
37ss -lntu | grep 10051
38
39chkconfig zabbix_proxy on
10.3.4.3.2. zabbix-agent服务配置
 1rpm -ivh https://repo.zabbix.com/zabbix/3.4/rhel/6/x86_64/zabbix-release-3.4-1.el6.noarch.rpm
 2yum install zabbix-agent -y
 3cp -a /etc/zabbix/zabbix_agentd.conf /etc/zabbix/zabbix_agentd.conf.`date '+%F'`
 4
 5sed -ir 's#^Server=127.0.0.1#Server=192.168.161.132#g' /etc/zabbix/zabbix_agentd.conf
 6grep "Server=192.168.161.132" /etc/zabbix/zabbix_agentd.conf
 7
 8/etc/init.d/zabbix-agent start
 9echo '############################' >>/etc/rc.local
10echo '#add by zzj at 20180930' >>/etc/rc.local
11echo '/etc/init.d/zabbix-agent start' >>/etc/rc.local
10.3.4.4. 配置zabbix主服务器和proxy关联
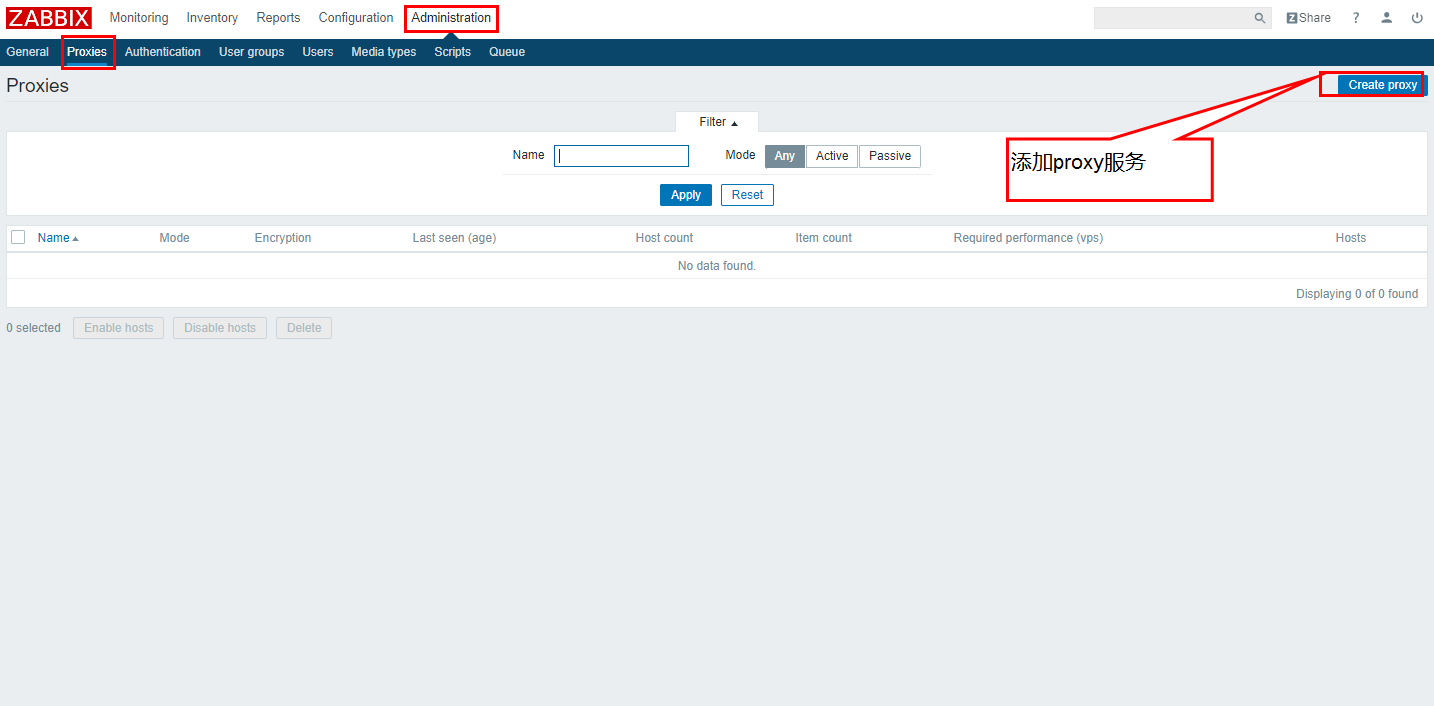
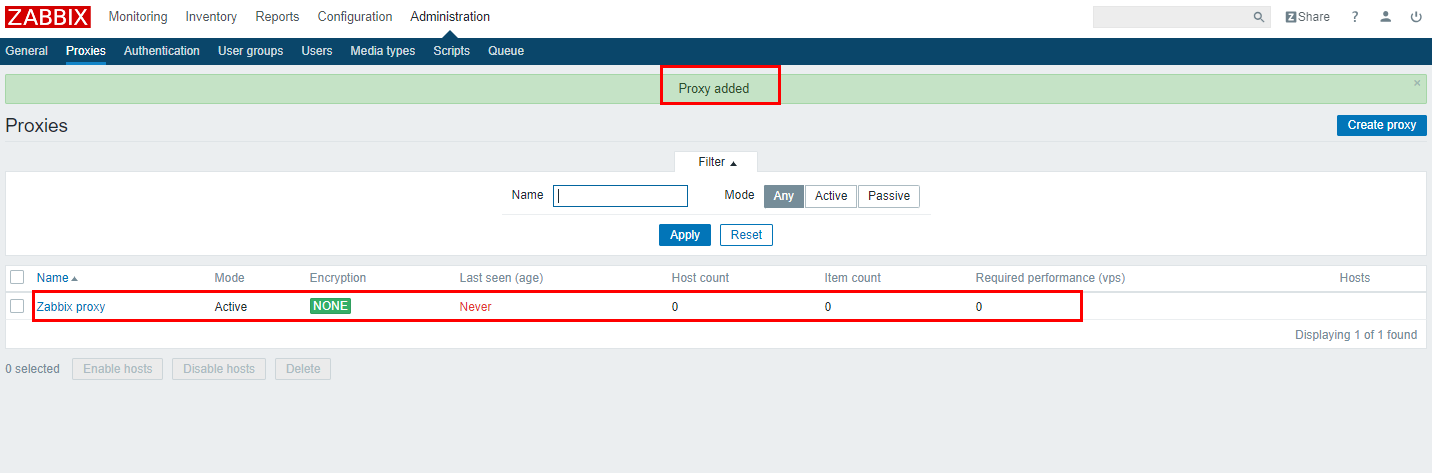
10.3.4.4.1. zabbix添加proxy
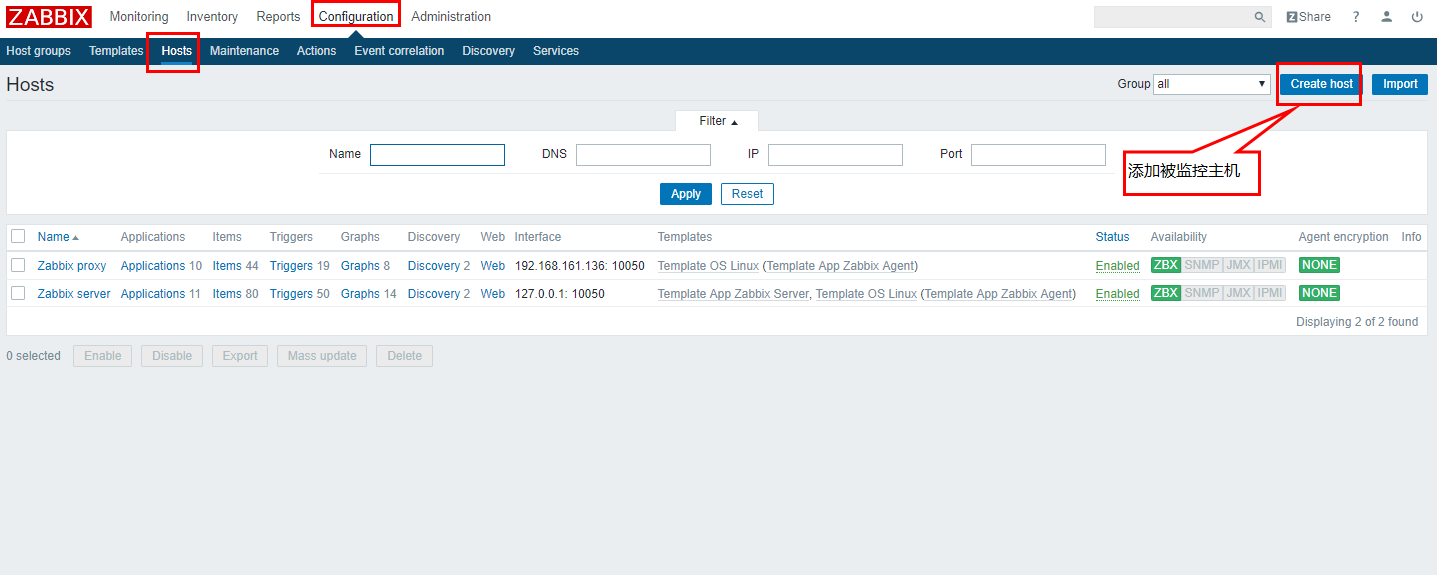
在zabbix服务器添加proxy主要在zabbix的web界面添加。具体过程如下:
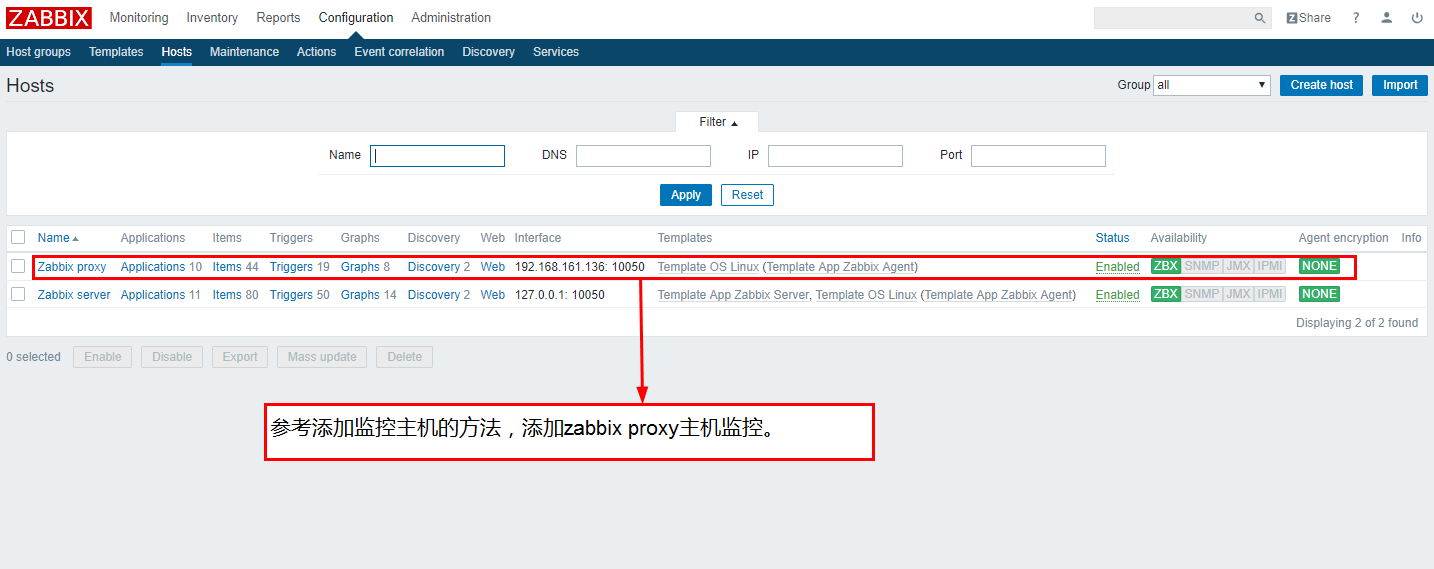
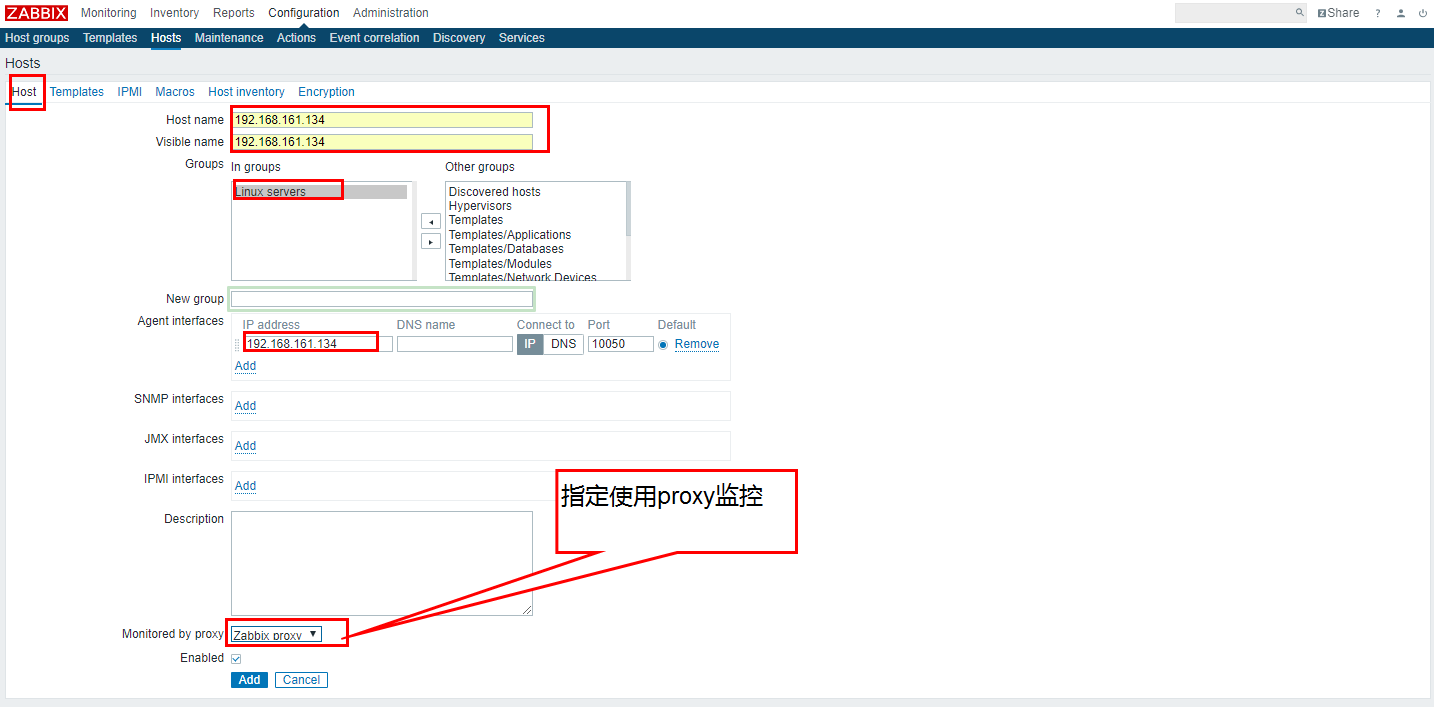
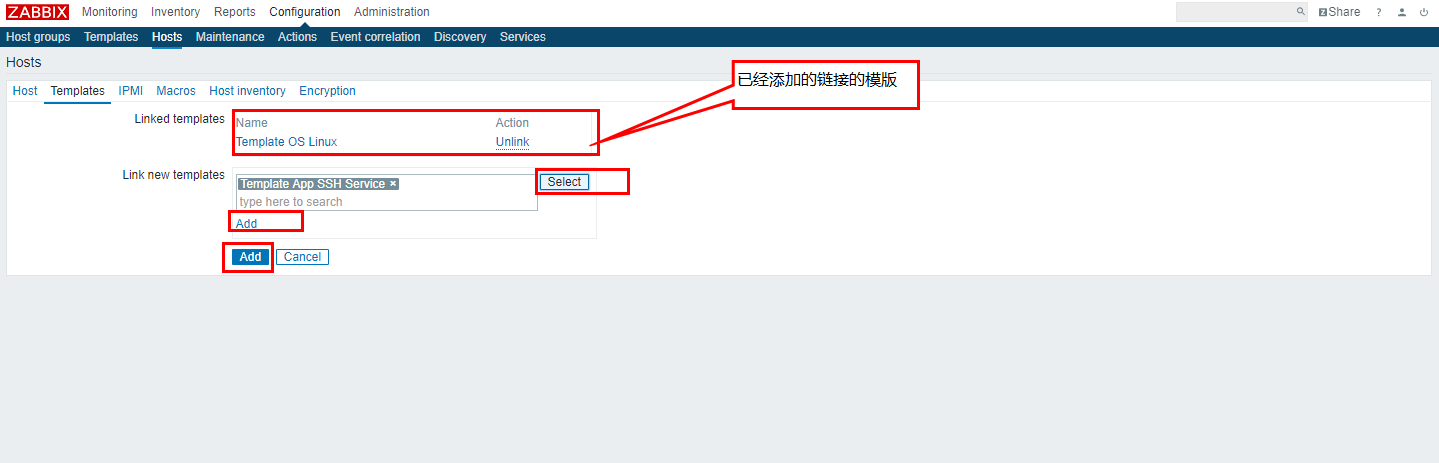
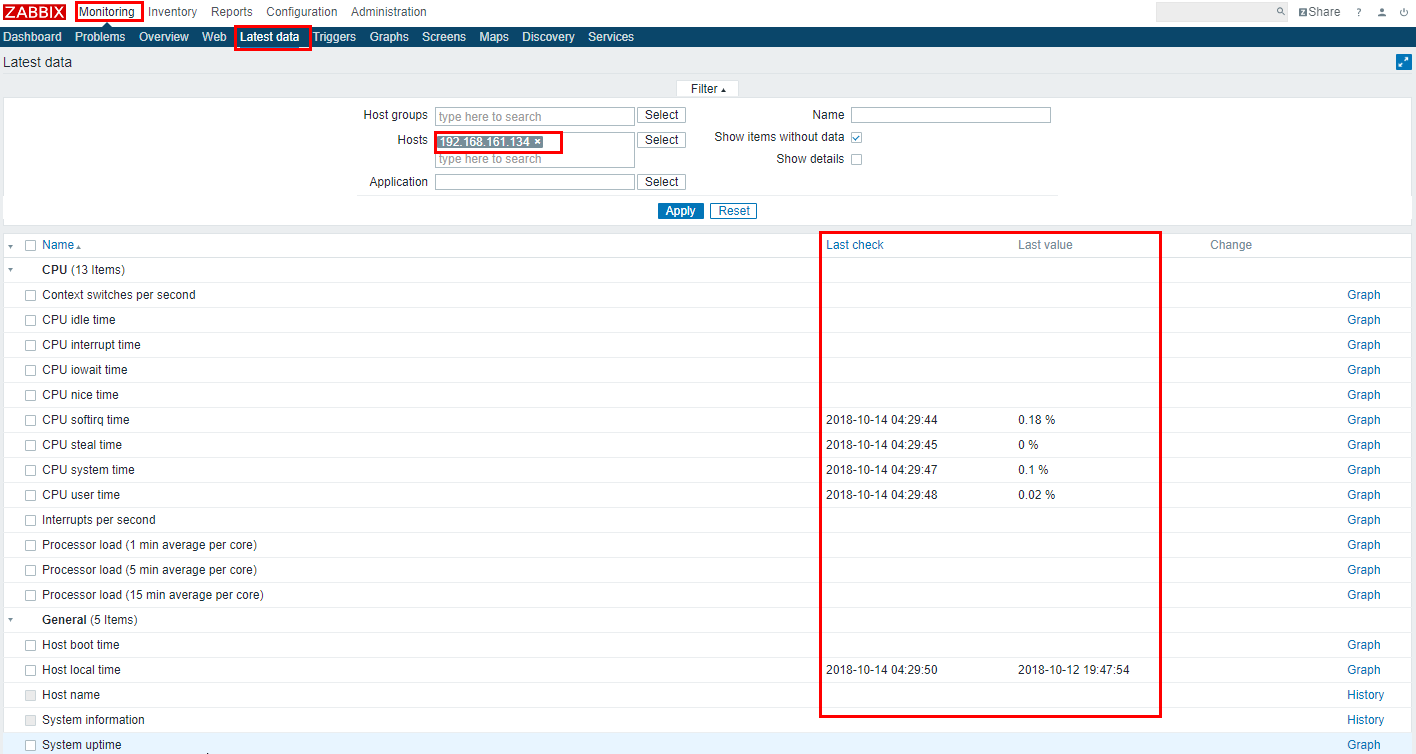
10.3.4.4.2. zabbix添加使用proxy监控的host