11.2. docker基础
11.2.1. docker安装
centos7配置docker源并安装docker
1[root@centos-151 ~]# cd /etc/yum.repos.d/
2[root@centos-151 yum.repos.d]# ls
3bak  CentOS-Base.repo  epel.repo  mariadb.repo.bak
4[root@centos-151 yum.repos.d]# wget http://mirrors.aliyun.com/docker-ce/linux/centos/docker-ce.repo
5
6[root@centos-151 ~]# yum install docker
CentOS6通过 epel-release 来安装docker
- epel-release:
Enterprise Linux(或EPEL)的额外软件包,企业Linux额外包(EPEL)
- RHEL / CentOS 6:
#yum install https://dl.fedoraproject.org/pub/epel/epel-release-latest-6.noarch.rpm
- RHEL / CentOS 7:
#yum install https://dl.fedoraproject.org/pub/epel/epel-release-latest-7.noarch.rpm
注意
一般可以通过 yum install epel-release -y 来安装。
安装完 epel-release 以后,可以查看docker安装信息:
CentOS6安装docker:
1yum install docker-io -y
1rpm -qa docker-io
2rpm -ql docker-io
11.2.1.1. 配置docker开机自启动
CentOS7:
1[root@centos-151 ~]# systemctl enable docker
2#启动docker
3[root@centos-151 ~]# systemctl start docker
CentOS6:
1chkconfig docker on
2#启动docker
3/etc/init.d/docker start
11.2.2. docker信息获取
获取version
注意
查看docker版本信息,需要先启动docker。如果没有启动是不能查看的。
 1[root@zzjlogin ~]# docker version
 2Client version: 1.7.1
 3Client API version: 1.19
 4Go version (client): go1.4.2
 5Git commit (client): 786b29d/1.7.1
 6OS/Arch (client): linux/amd64
 7Server version: 1.7.1
 8Server API version: 1.19
 9Go version (server): go1.4.2
10Git commit (server): 786b29d/1.7.1
11OS/Arch (server): linux/amd64
获取info
 1[root@zzjlogin ~]# docker info
 2Containers: 0
 3Images: 0
 4Storage Driver: devicemapper
 5Pool Name: docker-8:3-40736-pool
 6Pool Blocksize: 65.54 kB
 7Backing Filesystem: extfs
 8Data file: /dev/loop0
 9Metadata file: /dev/loop1
10Data Space Used: 305.7 MB
11Data Space Total: 107.4 GB
12Data Space Available: 656.1 MB
13Metadata Space Used: 729.1 kB
14Metadata Space Total: 2.147 GB
15Metadata Space Available: 656.1 MB
16Udev Sync Supported: true
17Deferred Removal Enabled: false
18Data loop file: /var/lib/docker/devicemapper/devicemapper/data
19Metadata loop file: /var/lib/docker/devicemapper/devicemapper/metadata
20Library Version: 1.02.89-RHEL6 (2014-09-01)
21Execution Driver: native-0.2
22Logging Driver: json-file
23Kernel Version: 2.6.32-504.el6.x86_64
24Operating System: <unknown>
25CPUs: 1
26Total Memory: 980.8 MiB
27Name: zzjlogin
28ID: GAII:U77Y:CUAH:NJ7Y:XE6M:SB7I:UD3Z:UHVO:VPDZ:RONM:7VQH:MMZ3
11.2.3. docker常用命令
 1docker run      运行一个容器
 2docker create   创建,需要在配合start命令
 3docker start    启动一个创建好的容器
 4docker stop     停止容器
 5docker kill     杀掉容器
 6docker restart  重启容器
 7docker pause    暂停容器
 8docker search   查询registry的相关镜像
 9docker pull     从registry拉取镜像
10docker push     推送到registry
11docker save     保存成压缩包
12docker load     从压缩包加载进来
13docker log      查看日志信息
14docker info     查看docker信息
15docker version  查看docker版本
16docker inspect  查看镜像容器信息
17docker images   查看已有镜像信息
18docker rm       删除容器
1[root@centos-151 ~]# docker
2build      diff       history    inspect    logs       port       restart    search     stats      top        wait
3commit     events     image      kill       network    ps         rm         secret     stop       unpause
4container  exec       images     load       node       pull       rmi        service    swarm      update
5cp         export     import     login      pause      push       run        stack      system     version
6create     help       info       logout     plugin     rename     save       start      tag        volume
11.2.4. docker run常用命令
  1[root@centos-151 ~]# docker help run
  2
  3Usage:      docker run [OPTIONS] IMAGE [COMMAND] [ARG...]
  4
  5Run a command in a new container
  6
  7Options:
  8    --add-host list                         Add a custom host-to-IP mapping (host:ip) (default [])
  9-a, --attach list                           Attach to STDIN, STDOUT or STDERR (default [])
 10    --blkio-weight uint16                   Block IO (relative weight), between 10 and 1000, or 0 to disable (default 0)
 11    --blkio-weight-device weighted-device   Block IO weight (relative device weight) (default [])
 12    --cap-add list                          Add Linux capabilities (default [])
 13    --cap-drop list                         Drop Linux capabilities (default [])
 14    --cgroup-parent string                  Optional parent cgroup for the container
 15    --cidfile string                        Write the container ID to the file
 16    --cpu-count int                         CPU count (Windows only)
 17    --cpu-percent int                       CPU percent (Windows only)
 18    --cpu-period int                        Limit CPU CFS (Completely Fair Scheduler) period
 19    --cpu-quota int                         Limit CPU CFS (Completely Fair Scheduler) quota
 20    --cpu-rt-period int                     Limit CPU real-time period in microseconds
 21    --cpu-rt-runtime int                    Limit CPU real-time runtime in microseconds
 22-c, --cpu-shares int                        CPU shares (relative weight)
 23    --cpus decimal                          Number of CPUs (default 0.000)
 24    --cpuset-cpus string                    CPUs in which to allow execution (0-3, 0,1)
 25    --cpuset-mems string                    MEMs in which to allow execution (0-3, 0,1)
 26    --credentialspec string                 Credential spec for managed service account (Windows only)
 27-d, --detach                                Run container in background and print container ID
 28    --detach-keys string                    Override the key sequence for detaching a container
 29    --device list                           Add a host device to the container (default [])
 30    --device-read-bps throttled-device      Limit read rate (bytes per second) from a device (default [])
 31    --device-read-iops throttled-device     Limit read rate (IO per second) from a device (default [])
 32    --device-write-bps throttled-device     Limit write rate (bytes per second) to a device (default [])
 33    --device-write-iops throttled-device    Limit write rate (IO per second) to a device (default [])
 34    --disable-content-trust                 Skip image verification (default true)
 35    --dns list                              Set custom DNS servers (default [])
 36    --dns-option list                       Set DNS options (default [])
 37    --dns-search list                       Set custom DNS search domains (default [])
 38    --entrypoint string                     Overwrite the default ENTRYPOINT of the image
 39-e, --env list                              Set environment variables (default [])
 40    --env-file list                         Read in a file of environment variables (default [])
 41    --expose list                           Expose a port or a range of ports (default [])
 42    --group-add list                        Add additional groups to join (default [])
 43    --health-cmd string                     Command to run to check health
 44    --health-interval duration              Time between running the check (ns|us|ms|s|m|h) (default 0s)
 45    --health-retries int                    Consecutive failures needed to report unhealthy
 46    --health-timeout duration               Maximum time to allow one check to run (ns|us|ms|s|m|h) (default 0s)
 47    --help                                  Print usage
 48-h, --hostname string                       Container host name
 49    --init                                  Run an init inside the container that forwards signals and reaps processes
 50    --init-path string                      Path to the docker-init binary
 51-i, --interactive                           Keep STDIN open even if not attached
 52    --io-maxbandwidth string                Maximum IO bandwidth limit for the system drive (Windows only)
 53    --io-maxiops uint                       Maximum IOps limit for the system drive (Windows only)
 54    --ip string                             Container IPv4 address (e.g. 172.30.100.104)
 55    --ip6 string                            Container IPv6 address (e.g. 2001:db8::33)
 56    --ipc string                            IPC namespace to use
 57    --isolation string                      Container isolation technology
 58    --kernel-memory string                  Kernel memory limit
 59-l, --label list                            Set meta data on a container (default [])
 60    --label-file list                       Read in a line delimited file of labels (default [])
 61    --link list                             Add link to another container (default [])
 62    --link-local-ip list                    Container IPv4/IPv6 link-local addresses (default [])
 63    --log-driver string                     Logging driver for the container
 64    --log-opt list                          Log driver options (default [])
 65    --mac-address string                    Container MAC address (e.g. 92:d0:c6:0a:29:33)
 66-m, --memory string                         Memory limit
 67    --memory-reservation string             Memory soft limit
 68    --memory-swap string                    Swap limit equal to memory plus swap: '-1' to enable unlimited swap
 69    --memory-swappiness int                 Tune container memory swappiness (0 to 100) (default -1)
 70    --name string                           Assign a name to the container
 71    --network string                        Connect a container to a network (default "default")
 72    --network-alias list                    Add network-scoped alias for the container (default [])
 73    --no-healthcheck                        Disable any container-specified HEALTHCHECK
 74    --oom-kill-disable                      Disable OOM Killer
 75    --oom-score-adj int                     Tune host's OOM preferences (-1000 to 1000)
 76    --pid string                            PID namespace to use
 77    --pids-limit int                        Tune container pids limit (set -1 for unlimited)
 78    --privileged                            Give extended privileges to this container
 79-p, --publish list                          Publish a container's port(s) to the host (default [])
 80-P, --publish-all                           Publish all exposed ports to random ports
 81    --read-only                             Mount the container's root filesystem as read only
 82    --restart string                        Restart policy to apply when a container exits (default "no")
 83    --rm                                    Automatically remove the container when it exits
 84    --runtime string                        Runtime to use for this container
 85    --security-opt list                     Security Options (default [])
 86    --shm-size string                       Size of /dev/shm, default value is 64MB
 87    --sig-proxy                             Proxy received signals to the process (default true)
 88    --stop-signal string                    Signal to stop a container, SIGTERM by default (default "SIGTERM")
 89    --stop-timeout int                      Timeout (in seconds) to stop a container
 90    --storage-opt list                      Storage driver options for the container (default [])
 91    --sysctl map                            Sysctl options (default map[])
 92    --tmpfs list                            Mount a tmpfs directory (default [])
 93-t, --tty                                   Allocate a pseudo-TTY
 94    --ulimit ulimit                         Ulimit options (default [])
 95-u, --user string                           Username or UID (format: <name|uid>[:<group|gid>])
 96    --userns string                         User namespace to use
 97    --uts string                            UTS namespace to use
 98-v, --volume list                           Bind mount a volume (default [])
 99    --volume-driver string                  Optional volume driver for the container
100    --volumes-from list                     Mount volumes from the specified container(s) (default [])
101-w, --workdir string                        Working directory inside the container
102
103# 上面就是获取run子命令的方法, 常用的选项是下面几个
104-i: 交互模式
105-t: 分配终端
106-v: 卷设置
107-p: 端口配置
108-h: 主机名
109-a: 附加
110-e:  环境变量
111--rm: 停掉容器就删除
11.2.5. 阿里云使用阿里云docker仓库拉取和分发
11.2.5.1. 阿里云ECS
在拉取和分发之前需要配置下docker加速,因为默认是从dockerhub上拉取的,比较慢,这个可以根据实际情况修改。
- 阿里的docker加速配置:
11.2.5.1.1. docker加速器配置
- 具体步骤:
首先是访问:https://dev.aliyun.com/search.html,然后登陆阿里云账号。
根据镜像加速中的操作文档操作。其中加速地址和账号有关联。根据这个操作文档配置
ECS的docker然后进入
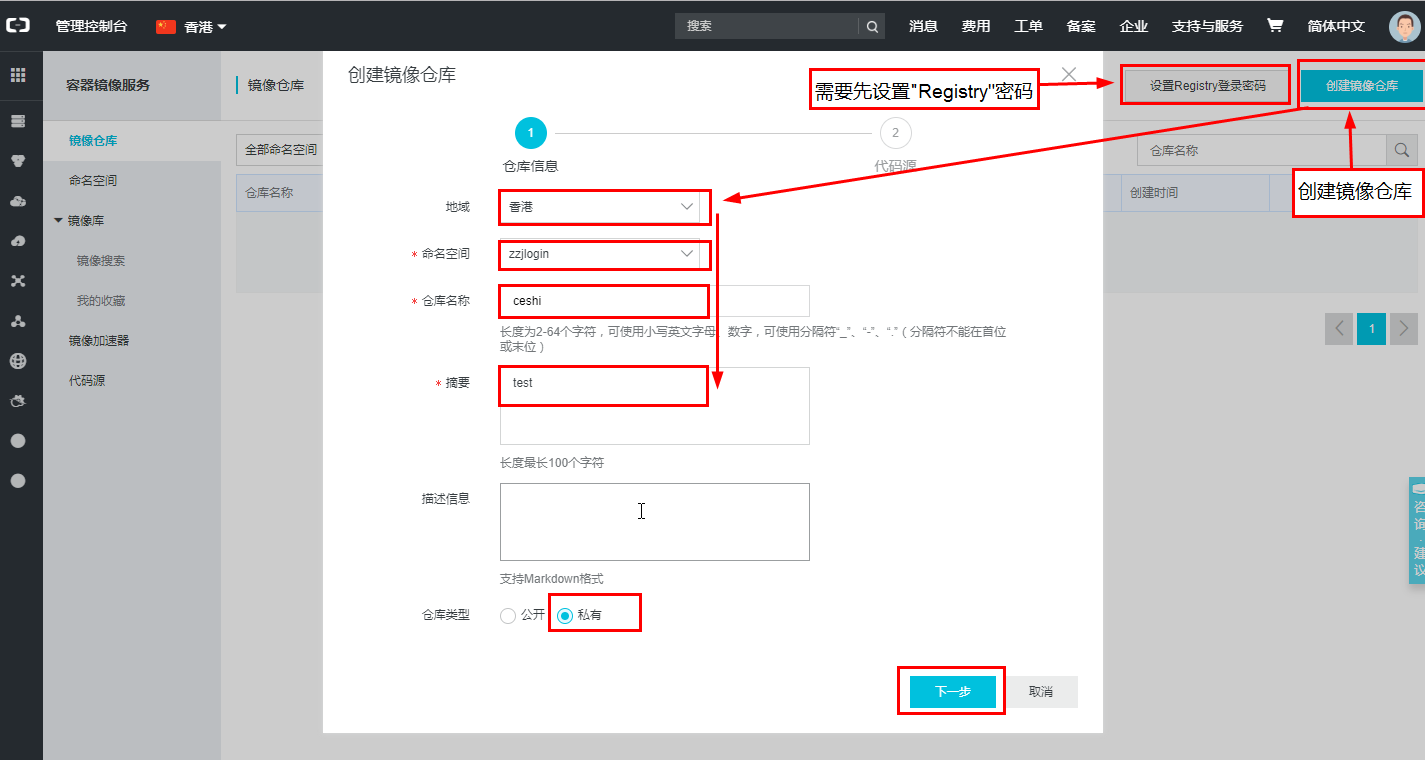
管理中心初次使用设置
Registry登陆密码,这个密码之后从云主机推送或者拉取自建镜像使用。创建
命名空间创建
镜像仓库
注意
创建 镜像仓库 的时候可以选择
备注
上面的加速地址,是阿里云给我分配的加速地址,如果没有阿里云的账号,可以使用docker中国的加速器,地址为https://registry.docker-cn.com
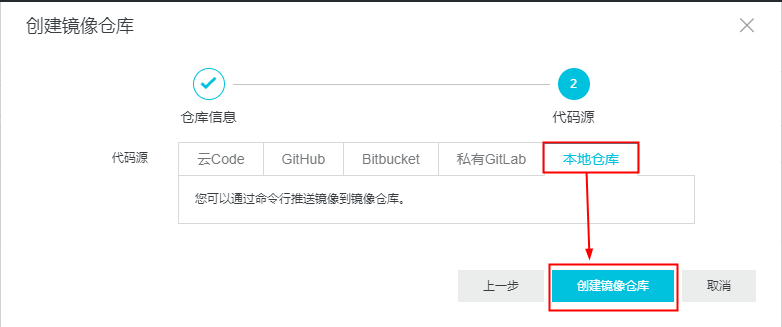
上面具体步骤重点步骤如下图说明:
创建仓库如下图:
提示
创建仓库需要先有命名空间。
如果使用的是代码仓库来创建docker仓库镜像,可以绑定不同的代码平台的账号,具体如下(举例github):
首先:
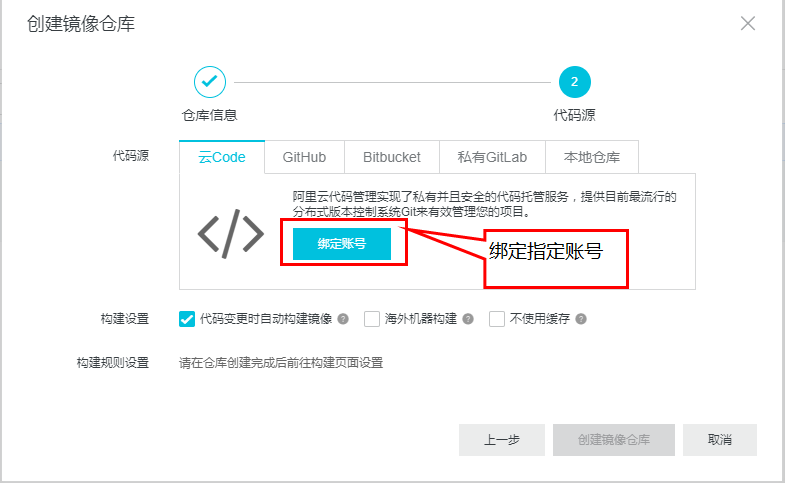
然后绑定对应的账号:
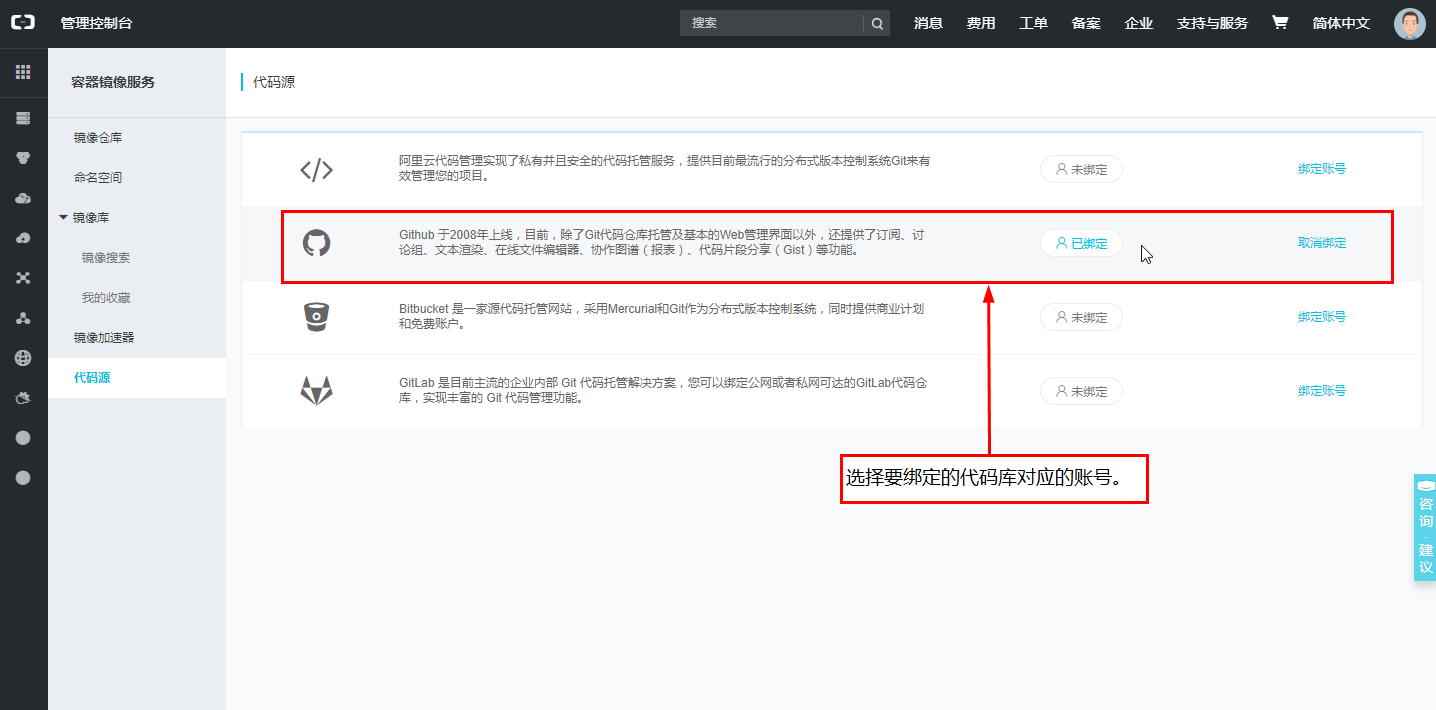
根据绑定代码平台账号创建仓库镜像
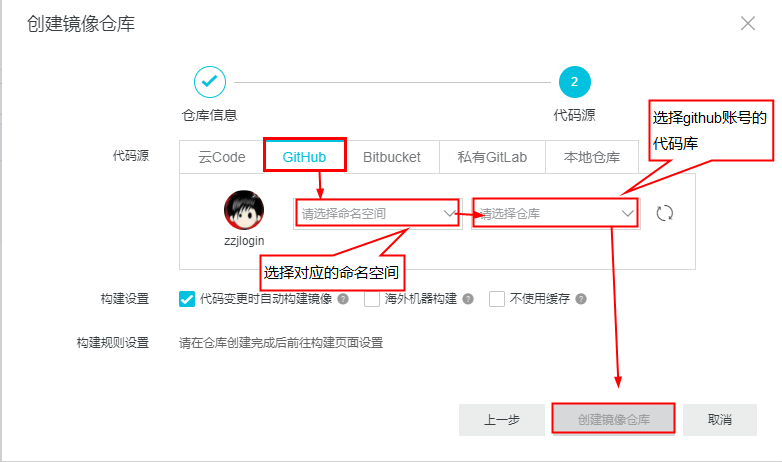
创建空的仓库,然后推送本地镜像到仓库。
准备下阿里云相关的配置:
 11. 登录阿里云Docker Registry
 2$ sudo docker login --username=1530225798@qq.com registry.cn-hongkong.aliyuncs.com
 3用于登录的用户名为阿里云账号全名,密码为开通服务时设置的密码。
 4
 5您可以在产品控制台首页修改登录密码。
 6
 72. 从Registry中拉取镜像
 8$ sudo docker pull registry.cn-hongkong.aliyuncs.com/zzjlogin/ceshi:[镜像版本号]
 93. 将镜像推送到Registry
10$ sudo docker login --username=1530225798@qq.com registry.cn-hongkong.aliyuncs.com
11$ sudo docker tag [ImageId] registry.cn-hongkong.aliyuncs.com/zzjlogin/ceshi:[镜像版本号]
12$ sudo docker push registry.cn-hongkong.aliyuncs.com/zzjlogin/ceshi:[镜像版本号]
13请根据实际镜像信息替换示例中的[ImageId]和[镜像版本号]参数。
14
154. 选择合适的镜像仓库地址
16从ECS推送镜像时,可以选择使用镜像仓库内网地址。推送速度将得到提升并且将不会损耗您的公网流量。
17
18如果您使用的机器位于经典网络,请使用 registry-internal.cn-hongkong.aliyuncs.com 作为Registry的域名登录,并作为镜像命名空间前缀。
19如果您使用的机器位于VPC网络,请使用 registry-vpc.cn-hongkong.aliyuncs.com 作为Registry的域名登录,并作为镜像命名空间前缀。
205. 示例
21使用"docker tag"命令重命名镜像,并将它通过专有网络地址推送至Registry。
22
23$ sudo docker images
24REPOSITORY                                                         TAG                 IMAGE ID            CREATED             VIRTUAL SIZE
25registry.aliyuncs.com/acs/agent                                    0.7-dfb6816         37bb9c63c8b2        7 days ago          37.89 MB
26$ sudo docker tag 37bb9c63c8b2 registry-vpc.cn-hongkong.aliyuncs.com/acs/agent:0.7-dfb6816
27使用"docker images"命令找到镜像,将该镜像名称中的域名部分变更为Registry专有网络地址。
28
29$ sudo docker push registry-vpc.cn-hongkong.aliyuncs.com/acs/agent:0.7-dfb6816
11.2.6. 普通主机使用docker-hub公共镜像pull下来镜像
查找:
 1[root@zzjlogin ~]# docker search centos-io
 2NAME                                 DESCRIPTION                                     STARS     OFFICIAL   AUTOMATED
 3centos                               The official build of CentOS.                   4679      [OK]
 4iojs                                 io.js is an npm compatible platform origin...   127       [OK]
 5ansible/centos7-ansible              Ansible on Centos7                              116                  [OK]
 6jdeathe/centos-ssh                   CentOS-6 6.10 x86_64 / CentOS-7 7.5.1804 x...   99                   [OK]
 7agileek/ionic-framework              Run ionic framework                             87                   [OK]
 8openshift/base-centos7               A Centos7 derived base image for Source-To...   33
 9beevelop/ionic                       Latest Ionic based on the latest Cordova, ...   30                   [OK]
10iotaledger/iri                       IOTA Reference Implementation                   16                   [OK]
11bluedigits/iota-node                 IOTA Full Node                                  9                    [OK]
12mesosphere/iot-demo                  IoT demo Docker image.                          9                    [OK]
13buanet/iobroker                      Docker Image for ioBroker based on Debian ...   9                    [OK]
14pivotaldata/centos-gpdb-dev          CentOS image for GPDB development. Tag nam...   7
15asmaps/docker-iodine                 Dockerized iodine server                        6                    [OK]
16marcoturi/ionic                      Ionic image for CI with karma and protract...   5                    [OK]
17microsoft/iot-edge-opc-publisher     Azure IoT Edge OPC Publisher Module             5                    [OK]
18microsoft/iot-gateway-opc-ua-proxy   Azure IoT Edge OPC Proxy Module                 5                    [OK]
19microsoft/iot-edge-opc-proxy         Azure IoT Edge OPC Proxy Module                 4                    [OK]
20iobroker/iobroker                    This is docker version of ioBroker Home-Au...   3                    [OK]
21pivotaldata/centos                   Base centos, freshened up a little with a ...   2
22plusrseito/centos-ionic                                                              0
23applet/applet-io                     applet-io repository                            0
24cubedhost/tools-3h-io                tools-3h-io                                     0                    [OK]
25turistforeningen/ruby-iojs           Docker Image with Ruby and io.js installed      0                    [OK]
26aerogearcatalog/ios-app-apb          APB for creating an iOS App                     0                    [OK]
27oblique/iodined                      Docker image for iodine server                  0                    [OK]
把镜像下载到本地:
 1[root@zzjlogin ~]# docker pull centos
 2latest: Pulling from centos
 3675ac122cafb: Pull complete
 4a4875ffe6057: Pull complete
 5c5507be714a7: Pull complete
 6Digest: sha256:5d91c5535c41fd1bb48d40581a2c8b53d38fc2eb26df774556b53c5a0bd4d44e
 7Status: Downloaded newer image for centos:latest
 8[root@zzjlogin ~]# docker images
 9REPOSITORY          TAG                 IMAGE ID            CREATED             VIRTUAL SIZE
10centos              latest              c5507be714a7        5 weeks ago         199.7 MB
11.2.6.1. 镜像保存(save)
1[root@centos-151 yum.repos.d]# docker save busybox alpine | gzip > tree.tgz
2[root@centos-151 yum.repos.d]# scp tree.tgz  192.168.46.152:/root
11.2.6.2. 镜像加载(load)
 1[root@centos-152 ~]# docker help load
 2[root@centos-152 ~]# docker image load -i tree.tgz
 33e596351c689: Loading layer [==================================================>]  1.36 MB/1.36 MB
 4Loaded image: docker.io/busybox:latest
 5cd7100a72410: Loading layer [==================================================>] 4.403 MB/4.403 MB
 6Loaded image: docker.io/alpine:latest
 7[root@centos-152 ~]# docker image ls
 8REPOSITORY          TAG                 IMAGE ID            CREATED             SIZE
 9docker.io/busybox   latest              2716f21dc1e3        37 hours ago        1.15 MB
10docker.io/alpine    latest              3fd9065eaf02        2 months ago        4.15 MB
11.2.7. docker卷(Volumes)
docker的卷分为2种
bind挂载卷
docker自管理卷
注意
可以通过这些参数,映射本地文件到docker,这样可以达到docker和本地文件的共享。
 1[root@centos-151 ~]# docker run --name nginx03    -v /data:/usr/share/nginx/html -d  nginx:1.12-alpine
 230a8824241a92439547ac5918f75404d3f9953b987c61e0cbada0efe67ef7463
 3
 4[root@centos-151 ~]# mkdir /data
 5[root@centos-151 ~]# echo "my page"  > /data/index.html
 6[root@centos-151 ~]# docker inspect  nginx03  |grep -i ipa
 7            "SecondaryIPAddresses": null,
 8            "IPAddress": "172.17.0.3",
 9            "IPAMConfig": null,
10            "IPAddress": "172.17.0.3",
11
12[root@centos-151 ~]# curl 172.17.0.3
13my page
14# 查看ip信息还有比较好用的方法,个人不习惯用
15[root@centos-151 ~]# docker inspect -f {{.NetworkSettings.Networks.bridge.IPAddress}} nginx03
16172.17.0.3
17
18# 查看bind信息
19[root@centos-151 ~]# docker inspect -f {{.Mounts}} nginx03
20[{bind  /data /usr/share/nginx/html   true rprivate}]
21# 复制卷信息,去启动
22[root@centos-151 ~]# docker run -d --name nginx04 --volumes-from nginx03 nginx:1.12-alpine
23ab414efa85818929d837c2baeb7a271b042eb46ac8ec40431c3d9b33ab6eee07
11.2.8. docker网络
docker的网络分为四种
closed: 封闭的, 只有lo本地回环网卡
bridged: 桥接,这是默认的
joined: 连接的,多个docker公用一个network命名空间
opened: 开放的,和宿主机一个命名空间
11.2.8.1. 查看网络列表
1[root@centos-151 ~]# docker network ls
2NETWORK ID          NAME                DRIVER              SCOPE
3e00b7e276b12        bridge              bridge              local
442c62865be61        host                host                local
5ccb7572950be        none                null                local
11.2.8.2. bridge
 1[root@centos-151 ~]# docker run --name busybox10 -it busybox
 2/ # ifconfig
 3eth0      Link encap:Ethernet  HWaddr 02:42:AC:11:00:05
 4        inet addr:172.17.0.5  Bcast:0.0.0.0  Mask:255.255.0.0
 5        inet6 addr: fe80::42:acff:fe11:5/64 Scope:Link
 6        UP BROADCAST RUNNING MULTICAST  MTU:1500  Metric:1
 7        RX packets:6 errors:0 dropped:0 overruns:0 frame:0
 8        TX packets:6 errors:0 dropped:0 overruns:0 carrier:0
 9        collisions:0 txqueuelen:0
10        RX bytes:508 (508.0 B)  TX bytes:508 (508.0 B)
11
12lo        Link encap:Local Loopback
13        inet addr:127.0.0.1  Mask:255.0.0.0
14        inet6 addr: ::1/128 Scope:Host
15        UP LOOPBACK RUNNING  MTU:65536  Metric:1
16        RX packets:0 errors:0 dropped:0 overruns:0 frame:0
17        TX packets:0 errors:0 dropped:0 overruns:0 carrier:0
18        collisions:0 txqueuelen:1
19        RX bytes:0 (0.0 B)  TX bytes:0 (0.0 B)
20
21/ # ^C
22/ # exit
11.2.8.3. closed
 1[root@centos-151 ~]# docker run --name busybox11 -it --network none busybox
 2/ # ifconfig
 3lo        Link encap:Local Loopback
 4        inet addr:127.0.0.1  Mask:255.0.0.0
 5        inet6 addr: ::1/128 Scope:Host
 6        UP LOOPBACK RUNNING  MTU:65536  Metric:1
 7        RX packets:0 errors:0 dropped:0 overruns:0 frame:0
 8        TX packets:0 errors:0 dropped:0 overruns:0 carrier:0
 9        collisions:0 txqueuelen:1
10        RX bytes:0 (0.0 B)  TX bytes:0 (0.0 B)
11
12/ # exit
11.2.8.4. joined
 1[root@centos-151 ~]# docker run --name nginx11 -d  --rm nginx:1.12-alpine
 2cf5e89cddf175152472d25d51d52ae1e136bc5887682f24203bb178487674103
 3[root@centos-151 ~]# docker inspect  nginx11 |grep -i ipa
 4            "SecondaryIPAddresses": null,
 5            "IPAddress": "172.17.0.5",
 6                    "IPAMConfig": null,
 7                    "IPAddress": "172.17.0.5",
 8[root@centos-151 ~]# docker run --name busybox12 --rm -it --network container:nginx11 busybox
 9/ # curl localhost
10sh: curl: not found
11/ # wget localhost
12Connecting to localhost (127.0.0.1:80)
13index.html           100% |**************************************************************************************************************************************************|   612   0:00:00 ETA
14/ # cat index.html
15<!DOCTYPE html>
16<html>
17<head>
18<title>Welcome to nginx!</title>
19<style>
20    body {
21        width: 35em;
22        margin: 0 auto;
23        font-family: Tahoma, Verdana, Arial, sans-serif;
24    }
25</style>
26</head>
27<body>
28<h1>Welcome to nginx!</h1>
29<p>If you see this page, the nginx web server is successfully installed and
30working. Further configuration is required.</p>
31
32<p>For online documentation and support please refer to
33<a href="http://nginx.org/">nginx.org</a>.<br/>
34Commercial support is available at
35<a href="http://nginx.com/">nginx.com</a>.</p>
36
37<p><em>Thank you for using nginx.</em></p>
38</body>
39</html>
11.2.8.5. opened
 1[root@centos-151 ~]# docker run --name nginx15 -d  --network host nginx:1.12-alpine
 2f0fd0f9069cab8126c53cde3baa8d76a94e89abd709a7864b96bfeb400628677
 3[root@centos-151 ~]# docker inspect nginx15 |grep -i ipa
 4            "SecondaryIPAddresses": null,
 5            "IPAddress": "",
 6                    "IPAMConfig": null,
 7                    "IPAddress": "",
 8[root@centos-151 ~]# curl localhost
 9<!DOCTYPE html>
10<html>
11<head>
12<title>Welcome to nginx!</title>
13<style>
14    body {
15        width: 35em;
16        margin: 0 auto;
17        font-family: Tahoma, Verdana, Arial, sans-serif;
18    }
19</style>
20</head>
21<body>
22<h1>Welcome to nginx!</h1>
23<p>If you see this page, the nginx web server is successfully installed and
24working. Further configuration is required.</p>
25
26<p>For online documentation and support please refer to
27<a href="http://nginx.org/">nginx.org</a>.<br/>
28Commercial support is available at
29<a href="http://nginx.com/">nginx.com</a>.</p>
30
31<p><em>Thank you for using nginx.</em></p>
32</body>
33</html>
11.2.9. docker端口映射
 1[root@centos-151 ~]# docker run --name nginx17 -d  -p 80:80 nginx:1.12-alpine
 2dda9ec45687aa71d552a32e65bb7d703a1b2170ea57416543a67e2055e1f5052
 3
 4
 5[root@centos-152 ~]# clear
 6[root@centos-152 ~]# curl 192.168.46.151
 7<!DOCTYPE html>
 8<html>
 9<head>
10<title>Welcome to nginx!</title>
11<style>
12    body {
13        width: 35em;
14        margin: 0 auto;
15        font-family: Tahoma, Verdana, Arial, sans-serif;
16    }
17</style>
18</head>
19<body>
20<h1>Welcome to nginx!</h1>
21<p>If you see this page, the nginx web server is successfully installed and
22working. Further configuration is required.</p>
23
24<p>For online documentation and support please refer to
25<a href="http://nginx.org/">nginx.org</a>.<br/>
26Commercial support is available at
27<a href="http://nginx.com/">nginx.com</a>.</p>
28
29<p><em>Thank you for using nginx.</em></p>
30</body>
31</html>
查看映射
1[root@centos-151 ~]# docker port nginx17
280/tcp -> 0.0.0.0:80