12.2. 手动安装系统(kickstart+PXE)
- Date:
2018-09
12.2.1. 系统环境准备
12.2.1.1. 系统版本
1[root@centos-node1 ~]# cat /etc/redhat-release
2CentOS release 6.6 (Final)
3[root@centos-node1 ~]# uname -r
42.6.32-504.el6.x86_64
5[root@centos-node1 ~]# cat /etc/sysconfig/network
6NETWORKING=yes
7HOSTNAME=centos-node1
12.2.1.2. 网络时间同步
1[root@centos-node1 ~]# date
2Thu Sep  6 21:07:25 CST 2018
3[root@centos-node1 ~]# ntpdate pool.ntp.org
428 Sep 00:53:38 ntpdate[1577]: step time server 5.103.139.163 offset 1827966.915121 sec
12.2.1.3. 关闭selinux
注意
如果不关闭selinux也没有配置selinux。则安装以后zabbix会启动失败。会发现zabbix网页可以访问,但是提示zabbix服务没有启动。
- 永久关闭:
下面配置会让selinux的关闭重启系统后还是关闭状态。但是配置不会立即生效。
注意
通过 source /etc/selinux/config 也不能让修改的文件立即生效。所以需要下面的临时关闭的方式结合使用。
1[root@centos-node1 ~]# sed -i 's/SELINUX=enforcing/SELINUX=disabled/' /etc/selinux/config
2[root@centos-node1 ~]# grep SELINUX /etc/selinux/config
3# SELINUX= can take one of these three values:
4SELINUX=disabled
5# SELINUXTYPE= can take one of these two values:
6SELINUXTYPE=targeted
- 临时关闭:
下面配置是立即生效,但是系统重启后会失效。
1[root@centos-node1 ~]# getenforce
2Enforcing
3[root@centos-node1 ~]# setenforce 0
4[root@centos-node1 ~]# getenforce
5Permissive
12.2.1.4. 关闭防火墙
注意
防火墙一般都是关闭。如果不不关闭,也可以通过配置规则允许所有使用的端口被访问。
1[root@centos-node1 ~]# /etc/init.d/iptables stop
2iptables: Setting chains to policy ACCEPT: filter          [  OK  ]
3iptables: Flushing firewall rules:                         [  OK  ]
4iptables: Unloading modules:                               [  OK  ]
关闭防火墙开机自启动
1[root@centos-node1 ~]# chkconfig iptables off
12.2.1.5. 系统准备命令集合
1ntpdate pool.ntp.org
2sed -i 's/SELINUX=enforcing/SELINUX=disabled/' /etc/selinux/config
3setenforce 0
4/etc/init.d/iptables stop
5chkconfig iptables off
12.2.2. DHCP安装配置
安装dhcp服务:
1[root@centos-node1 ~]# yum install dhcp -y
查看DHCP安装目录:
1[root@centos-node1 ~]# rpm -ql dhcp
DHCP配置
 1[root@centos-node1 ~]# cat >>/etc/dhcp/dhcpd.conf<<EOF
 2> subnet 192.168.6.0 netmask 255.255.255.0 {
 3>         range 192.168.6.100 192.168.6.200;
 4>         option subnet-mask 255.255.255.0;
 5>         default-lease-time 21600;
 6>         max-lease-time 43200;
 7>         next-server 192.168.6.10;
 8>         filename "/pxelinux.0";
 9> }
10> EOF
11[root@centos-node1 ~]# cat /etc/dhcp/dhcpd.conf
12#
13# DHCP Server Configuration file.
14#   see /usr/share/doc/dhcp*/dhcpd.conf.sample
15#   see 'man 5 dhcpd.conf'
16#
17subnet 192.168.6.0 netmask 255.255.255.0 {
18        range 192.168.6.100 192.168.6.200;
19        option subnet-mask 255.255.255.0;
20        default-lease-time 21600;
21        max-lease-time 43200;
22        next-server 192.168.6.10;
23        filename "/pxelinux.0";
24}
检查网卡信息:
 1[root@centos-node1 ~]# ifconfig
 2eth0      Link encap:Ethernet  HWaddr 00:0C:29:B3:93:42
 3        inet addr:192.168.161.132  Bcast:192.168.161.255  Mask:255.255.255.0
 4        inet6 addr: fe80::20c:29ff:feb3:9342/64 Scope:Link
 5        UP BROADCAST RUNNING MULTICAST  MTU:1500  Metric:1
 6        RX packets:1014 errors:0 dropped:0 overruns:0 frame:0
 7        TX packets:592 errors:0 dropped:0 overruns:0 carrier:0
 8        collisions:0 txqueuelen:1000
 9        RX bytes:108635 (106.0 KiB)  TX bytes:97793 (95.5 KiB)
10
11eth1      Link encap:Ethernet  HWaddr 00:0C:29:B3:93:4C
12        inet addr:192.168.6.10  Bcast:192.168.6.255  Mask:255.255.255.0
13        inet6 addr: fe80::20c:29ff:feb3:934c/64 Scope:Link
14        UP BROADCAST RUNNING MULTICAST  MTU:1500  Metric:1
15        RX packets:4 errors:0 dropped:0 overruns:0 frame:0
16        TX packets:14 errors:0 dropped:0 overruns:0 carrier:0
17        collisions:0 txqueuelen:1000
18        RX bytes:316 (316.0 b)  TX bytes:916 (916.0 b)
19
20lo        Link encap:Local Loopback
21        inet addr:127.0.0.1  Mask:255.0.0.0
22        inet6 addr: ::1/128 Scope:Host
23        UP LOOPBACK RUNNING  MTU:65536  Metric:1
24        RX packets:0 errors:0 dropped:0 overruns:0 frame:0
25        TX packets:0 errors:0 dropped:0 overruns:0 carrier:0
26        collisions:0 txqueuelen:0
27        RX bytes:0 (0.0 b)  TX bytes:0 (0.0 b)
修改默认网关:
注意
这一步根据实际情况。本例子,因为默认网关192.168.6.1不能访问外网,所以修改了默认网关。
 1[root@centos-node1 ~]# route
 2Kernel IP routing table
 3Destination     Gateway         Genmask         Flags Metric Ref    Use Iface
 4192.168.6.0     *               255.255.255.0   U     0      0        0 eth1
 5192.168.161.0   *               255.255.255.0   U     0      0        0 eth0
 6link-local      *               255.255.0.0     U     1002   0        0 eth0
 7link-local      *               255.255.0.0     U     1003   0        0 eth1
 8default         192.168.6.1     0.0.0.0         UG    0      0        0 eth1
 9
10[root@centos-node1 ~]# route del default gw 192.168.6.1
11[root@centos-node1 ~]# route add default gw 192.168.161.2
启动DHCP
1[root@centos-node1 ~]# /etc/init.d/dhcpd start
2Starting dhcpd:                                            [  OK  ]
3
4[root@centos-node1 ~]# lsof -i :67
5COMMAND  PID  USER   FD   TYPE DEVICE SIZE/OFF NODE NAME
6dhcpd   1866 dhcpd    7u  IPv4  14762      0t0  UDP *:bootps
12.2.3. TFTP安装配置
tfpt安装:
1[root@centos-node1 ~]# yum install tftp-server -y
配置tftp:
 1[root@centos-node1 ~]# cat -n /etc/xinetd.d/tftp
 2    1  # default: off
 3    2  # description: The tftp server serves files using the trivial file transfer \
 4    3  #       protocol.  The tftp protocol is often used to boot diskless \
 5    4  #       workstations, download configuration files to network-aware printers, \
 6    5  #       and to start the installation process for some operating systems.
 7    6  service tftp
 8    7  {
 9    8          socket_type             = dgram
10    9          protocol                = udp
11    10          wait                    = yes
12    11          user                    = root
13    12          server                  = /usr/sbin/in.tftpd
14    13          server_args             = -s /var/lib/tftpboot
15    14          disable                 = yes
16    15          per_source              = 11
17    16          cps                     = 100 2
18    17          flags                   = IPv4
19    18  }
20
21[root@centos-node1 ~]# sed -i '14s/yes/no/' /etc/xinetd.d/tftp
22
23[root@centos-node1 ~]# cat -n /etc/xinetd.d/tftp
24    1  # default: off
25    2  # description: The tftp server serves files using the trivial file transfer \
26    3  #       protocol.  The tftp protocol is often used to boot diskless \
27    4  #       workstations, download configuration files to network-aware printers, \
28    5  #       and to start the installation process for some operating systems.
29    6  service tftp
30    7  {
31    8          socket_type             = dgram
32    9          protocol                = udp
33    10          wait                    = yes
34    11          user                    = root
35    12          server                  = /usr/sbin/in.tftpd
36    13          server_args             = -s /var/lib/tftpboot
37    14          disable                 = no
38    15          per_source              = 11
39    16          cps                     = 100 2
40    17          flags                   = IPv4
41    18  }
启动tftp服务:
1[root@centos-node1 ~]# /etc/init.d/xinetd start
2Starting xinetd:                                           [  OK  ]
3
4
5[root@centos-node1 ~]# ss -tunlp|grep 69
6udp    UNCONN     0      0                      *:68                    *:*      users:(("dhclient",3269,6))
7udp    UNCONN     0      0                      *:69                    *:*      users:(("xinetd",3449,5))
12.2.4. apache安装配置
安装apache:
1[root@centos-node1 ~]# yum -y install httpd
添加ServerName,防止http提示域名和主机名映射的问题:
1[root@centos-node1 ~]# sed -i "277i ServerName 127.0.0.1:80" /etc/httpd/conf/httpd.conf
启动apache服务:
1[root@centos-node1 ~]# /etc/init.d/httpd start
2Starting httpd:                                            [  OK  ]
查看http服务状态:
 1[root@centos-node1 ~]# lsof -i :80
 2COMMAND  PID   USER   FD   TYPE DEVICE SIZE/OFF NODE NAME
 3httpd   3553   root    4u  IPv6  18461      0t0  TCP *:http (LISTEN)
 4httpd   3554 apache    4u  IPv6  18461      0t0  TCP *:http (LISTEN)
 5httpd   3555 apache    4u  IPv6  18461      0t0  TCP *:http (LISTEN)
 6httpd   3556 apache    4u  IPv6  18461      0t0  TCP *:http (LISTEN)
 7httpd   3558 apache    4u  IPv6  18461      0t0  TCP *:http (LISTEN)
 8httpd   3559 apache    4u  IPv6  18461      0t0  TCP *:http (LISTEN)
 9httpd   3560 apache    4u  IPv6  18461      0t0  TCP *:http (LISTEN)
10httpd   3561 apache    4u  IPv6  18461      0t0  TCP *:http (LISTEN)
11httpd   3562 apache    4u  IPv6  18461      0t0  TCP *:http (LISTEN)
创建挂载系统的目录,建议用操作系统版本命名。这样方便以后安装其他版本系统:
1[root@centos-node1 ~]# mkdir /var/www/html/centos/6.6 -p
挂载并检查挂载情况:
1[root@centos-node1 ~]# mount /dev/cdrom /var/www/html/centos/6.6
2mount: block device /dev/sr0 is write-protected, mounting read-only
3[root@centos-node1 ~]# ls /var/www/html/centos/6.6/
4CentOS_BuildTag  GPL                       RPM-GPG-KEY-CentOS-6           RPM-GPG-KEY-CentOS-Testing-6  isolinux
5EFI              Packages                  RPM-GPG-KEY-CentOS-Debug-6     TRANS.TBL                     repodata
6EULA             RELEASE-NOTES-en-US.html  RPM-GPG-KEY-CentOS-Security-6  images
测试http访问情况:
1[root@centos-node1 ~]# curl -s -o /dev/null -I -w "%{http_code}\n" http://192.168.6.10/centos/6.6/
2200
12.2.5. 配置支持PXE的启动程序
安装syslinux
1[root@centos-node1 ~]# yum -y install syslinux
syslinux是一个功能强大的引导加载程序,而且兼容各种介质。 SYSLINUX是一个小型的Linux操作系统,它的目的是简化首次安装Linux的时间,并建立修护或其它特殊用途的启动盘。
1[root@centos-node1 ~]# cp /usr/share/syslinux/pxelinux.0 /var/lib/tftpboot/
2[root@centos-node1 ~]# cp -a /var/www/html/centos/6.6/isolinux/* /var/lib/tftpboot/
3[root@centos-node1 ~]# ls /var/lib/tftpboot/
4TRANS.TBL  boot.msg   initrd.img    isolinux.cfg  pxelinux.0  vesamenu.c32
5boot.cat   grub.conf  isolinux.bin  memtest       splash.jpg  vmlinuz
6
7[root@centos-node1 ~]# cp /var/www/html/centos/6.6/isolinux/isolinux.cfg /var/lib/tftpboot/pxelinux.cfg/default
12.2.6. 新服务器通过PXE手动安装系统
- 没有安装系统的服务器通过PXE安装系统步骤:
服务器网线插在和上面配置的node1同一局域网的交换机上面,这个网口需要可以通过DHCP获取上面服务器分配的IP地址。
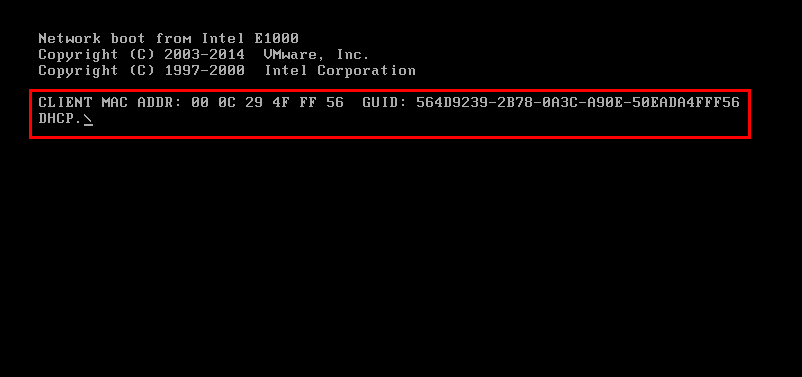
开机,DELL服务器按F12通过PXE启动。
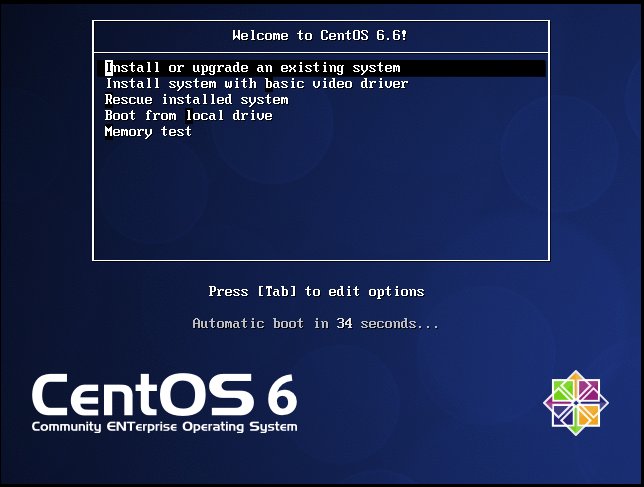
图形界面如下下面两个图,第二个图形开始就是正常安装。后序安装步骤省略。可以用鼠标/键盘然后控制继续点击选择然后继续下一步一直到安装完成即可。
注意安装过程,选择URL方式安装,然后具体的URL输入:http://192.168.6.10/centos/6.6/
12.2.6.1. 文件 /var/lib/tftpboot/pxelinux.cfg/default 注解
 1default vesamenu.c32  # 默认加载一个菜单
 2#prompt 1             # 开启会显示命令行'boot: '提示符。prompt值为0时则不提示,将会直接启动'default'参数中指定的内容。
 3timeout 600           # timeout时间是引导时等待用户手动选择的时间,设为1可直接引导,单位为1/10秒。
 4display boot.msg
 5# 菜单背景图片、标题、颜色。
 6menu background splash.jpg
 7menu title Welcome to CentOS 6.7!
 8menu color border 0 #ffffffff #00000000
 9menu color sel 7 #ffffffff #ff000000
10menu color title 0 #ffffffff #00000000
11menu color tabmsg 0 #ffffffff #00000000
12menu color unsel 0 #ffffffff #00000000
13menu color hotsel 0 #ff000000 #ffffffff
14menu color hotkey 7 #ffffffff #ff000000
15menu color scrollbar 0 #ffffffff #00000000
16# label指定在boot:提示符下输入的关键字,比如boot:linux[ENTER],这个会启动label linux下标记的kernel和initrd.img文件。
17label linux       # 一个标签就是前面图片的一行选项。
18menu label ^Install or upgrade an existing system
19menu default
20kernel vmlinuz  # 指定要启动的内核。同样要注意路径,默认是/tftpboot目录。
21append initrd=initrd.img # 指定追加给内核的参数,initrd.img是一个最小的linux系统
22label vesa
23menu label Install system with ^basic video driver
24kernel vmlinuz
25append initrd=initrd.img nomodeset
26label rescue
27menu label ^Rescue installed system
28kernel vmlinuz
29append initrd=initrd.img rescue
30label local
31menu label Boot from ^local drive
32localboot 0xffff
33label memtest86
34menu label ^Memory test
35kernel memtest
36append -
12.2.7. 配置PXE网络安装(非自动安装)命令集合
备注
下面挂载的镜像是CentOS7,所以目录名称有所改变。
本实例是通过挂载光驱得到的系统文件目录,而且直接挂载到了工作目录。
工作环境先导入镜像到系统,然后通过
mount -o loop /data/CentOS-7-x86_64-bin-DVD1.iso /mnt/然后把/mnt目录下的文件复制到工作目录。
 1chkconfig iptables off
 2
 3yum install tftp-server httpd dhcp syslinux -y
 4
 5>/etc/dhcp/dhcpd.conf
 6cat >>/etc/dhcp/dhcpd.conf <<EOF
 7        subnet 192.168.6.0 netmask 255.255.255.0 {
 8        range 192.168.6.100 192.168.6.200;
 9        option subnet-mask 255.255.255.0;
10        default-lease-time 21600;
11        max-lease-time 43200;
12        next-server 192.168.6.10;
13        filename "/pxelinux.0";
14}
15EOF
16
17sed -i '14s/yes/no/' /etc/xinetd.d/tftp
18sed -i "277i ServerName 127.0.0.1:80" /etc/httpd/conf/httpd.conf
19/etc/init.d/dhcpd start
20/etc/init.d/xinetd start
21/etc/init.d/httpd start
22
23mkdir /var/www/html/centos/7 -p
24mount /dev/cdrom /var/www/html/centos/7
25
26curl -s -o /dev/null -I -w "%{http_code}\n" http://192.168.6.10/centos/7/
27cp /usr/share/syslinux/pxelinux.0 /var/lib/tftpboot/
28cp -a /var/www/html/centos/7/isolinux/* /var/lib/tftpboot/
29
30mkdir /var/lib/tftpboot/pxelinux.cfg/
31cp /var/www/html/centos/7/isolinux/isolinux.cfg /var/lib/tftpboot/pxelinux.cfg/default